Be a better developer by thinking of many solutions

I try challenge my code on a regular bases. I have noticed my code get better the more I pause and question if it definitely is the best solution.

The goal is to solve a problem

I have a lot of designers for friends and what I have noticed is how designers approach their projects.

Brain storm

Designers tackle projects by brainstorming. They go sit and think about lots (and lots and lots) of creative ideas. They want a big collection of ideas, and then they want to take the top 3 or 5 (or 10 even) from that list.

As developers we should try this as well.

Brain storm naming conventions, folder structures, reusable services, tests, constants, best practices, useful abstractions etc. Will a new developer understand the code you have written? Is the code understandable without comments?

There are many aspects to the code you write that if overlooked could incur technical debt. Think about a big picture solution.

Have goals

When you start your code, decide what you need to achieve as a holistic solution. Certain goals should come with any final solution:

  • Is the code easy to test? Do the tests help make sure the code keeps working? (This is for developers who partake in the TDD approach).
  • Is the code self documenting? Is it easy to hand over to a new developer without any teaching required?
  • Can the code be altered easily?
  • Is the naming conventions consistent with the rest of the project?
  • Is the file and folder structure consistent and intuitive? Will other developers have to go on an Easter egg hunt to find the right file?
  • Can design patterns like SOLID help make the code neater?
  • Are your methods doing too much? Can you separate the code further?
  • Are best practices being used?

The list can go on and on. You should always keep these types of questions in your mind, and think of new ones to push your skills.

Beware the problem dressed as a solution

The first solution is not always the best solution. And be skeptical if you can only think of one solution. Our brains can be lazy. Ever have that situation where the easiest way to solve a problem becomes the most problematic to maintain?

A solution should not come at a high maintenance cost. Solutions should not be short term. Else you have just created another problem. Might not be a problem now, but it will be a problem eventually.

Will the real slim shady please stand up

Take the time to brainstorm and think of many ways to solve the problem you are facing. Have enough foresight to see which solution is the real long term solution.

Avoid technical debt. It will whittle away at your project and slowly destroy your passion for what you do.

Also keep in mind the team you work with. Designers, developers, strategists, project managers, business analysts, etc. Do not code something at the expense of the team’s efforts. Always remember to communicate often.

Code solutions, not problems. Word.

Npm node-http2 error ENOENT

I started up an existing full stack project on a new ubuntu installation. I ran npm install and bower install and on grunt serve I kept getting a similar error to this:

npm ERR! enoent ENOENT: no such file or directory

The error seemed to be triggered by node-http2 specifically.

I tried several approaches, I upgraded node, upgraded grunt. I uninstalled and reinstalled. Cleared cache.

What I finally realised the problem was, I needed to install yo. The project had been created using the yeoman generator.

Checklist:

  • Make sure npm is installed
  • Make sure bower is installed
  • Make sure grunt is installed
  • Make sure yo is installed

These are some additional commands I ran

Clear npm cache and reinstall npm

sudo npm cache clean -f

sudo npm install -g n

sudo n stable


Deleted the \tmp folder and receiving “bash: cannot create temp file for here-document: Permission denied” Error

I was trying to delete ~/tmp folder and accidentally deleted the /tmp folder. Then when I tried to ls a folder structure I kept getting this error:

bash: cannot create temp file for here-document: Permission denied

To fix the error I ran the following commands:

1
2
3
4
5
6
7
cd /

mkdir tmp

sudo chown root:root /tmp

sudo chmod 1777 /tmp


Laravel seeds error ReflectionException “Class does not exist error”

When I ran the following artisan seed command, I received an error:

php artisan db:seed

I kept receiving the following error:

[ReflectionException]
Class XTableSeeder does not exist

This command helped fix the error:

composer dump-autoload

Also check that you have a Seeder file in /database/seeds/

eg XTableSeeder.php

With content similar to this

<?php

use Illuminate\Database\Seeder;
use Illuminate\Database\Eloquent\Model;
use App\User;

class RoleTableSeeder extends Seeder {

public function run() {
DB::table(‘x’)->delete();
DB::table(‘x’)->insert([

]);

}

And make sure you have added the call in the DatabaseSeeder.php file:

$this->call(‘XTableSeeder’);

Setting up putty on windows to ssh into a server without logging in each time

I often need to ssh onto a linux server from windows. Putty offers this ability. It is quick and easy to use. The only obstacle has been loggin in to the server each time. Below is the instructions to let putty automatically log you in and on to a server.

Download putty

You need to use Putty on windows to ssh into a server, use the following link to download putty.exe

http://www.chiark.greenend.org.uk/~sgtatham/putty/download.html


Downloading PuttyGen

You need to use PuttyGen to generate a key, use the following link to download puttygen.exe

http://www.chiark.greenend.org.uk/~sgtatham/putty/download.html

Use PuttyGen to generate an ssh key for windows

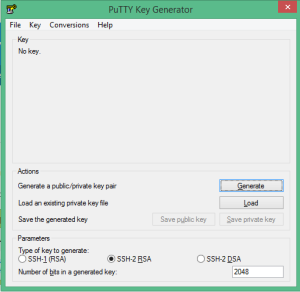
Open PuttyGen and generate a key by clicking the “Generate” button. Move your mouse around to generate the key.

puttygen-screen

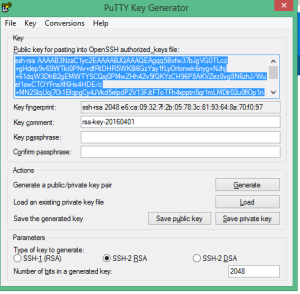
Then you can click “Save public key” and save you public key somewhere safe. Click “Save private key” and save if somewhere save.

puttygen-example

Note the Parameter “Type of key to generate” can be se to SSH-2 RSA and the Number of bits to 2048.

Copy the ssh key (you will add this to the server). And put it in notepad so you can use it later, after you have followed the below steps.

Set up putty to ssh into a linux server using a windows computer

Open putty

And do the following:

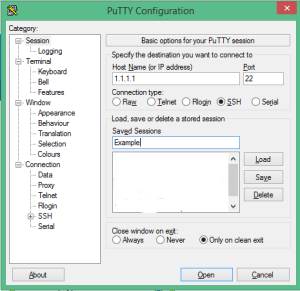
Step 1: Session

On the first screen, “Session” insert your serer’s IP Adress or Host Name. Port is usually 22 by default. And connection type is usually set to ssh. (Don’t click open yet)

putty-example-1

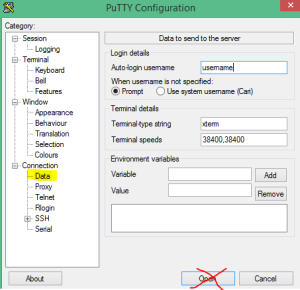
Step 2: Connection- Data

In the login details, insert the Auto-login username field with your server username. Eg “root”. (Don’t click open yet)

putty-example-2

Step 3: Connection – SSH – Auth

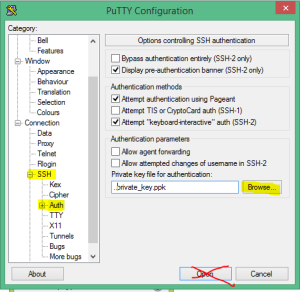
In the Auth section browser for the private key file you saved above. It should be a *.ppk file. (Don’t click open yet)

putty-example-3

Step 4: Save these settings. Session.

Now that you’ve set it up, make sure to save it so you don’t have to go through this process each time.

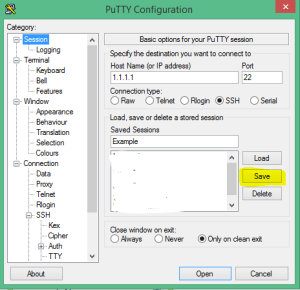
Go back to the Session section, and click on the Save button. (Don’t click open yet)

putty-example-4

Step 5: Open – Now you can click open

Once you are done setting it up, click “Open”. This will open a connection with the server in a new console window.

Add the ssh key to the server

Once you have a connection with the server you can type the following command:

sudo nano ~/.ssh/authorized_keys

Paste the full key you copied in a new line in this file.

ssh-rsa ….

If there are existing keys don’t replace those, just add to a new line.

Then ctr + X. And insert “Y” to save.

Check you have saved the above steps:

To exit the server connection click Ctrl + D. And this will close the window.

Then open putty again, load your server entry you just made, and click open.

You should now be automatically logged in.

Linux command to restart network manager

I have been using Ubuntu a lot more, and I often need to switch between different network connections and go on and off of a network proxy. All that jumping around tends to affect my connectivity to the different networks. I find that the connecting part tends to hang and I cannot connect to a network anymore.

I found this handy command to help with that:

sudo service network-manager restart

After the network manager restarted on Ubuntu I was able to connect to a network with no delay.

Tips to get docker set up on Ubuntu

So I recently tried setting up docker on ubuntu and ran into a few hurdles, below is the checklist of what needed to be setup or installed on Ubuntu in order to run a docker project.

Make sure these are installed/Setup

docker
docker-compose
virtualbox
docker-machine

Setting up the docker-machine default ip

Then using docker machine you need to setup an IP to run in a web browser.

There is more thorough documentation on the docker website. The summary of what I found worked:

Run the following commands:

docker-machine create –driver virtualbox default
docker-machine env default
eval $(docker-machine env default)

Get the ip address of default

docker-machine ip default

That ip is what you will be using in your browser to view the docker files.

When you run your docker container:

docker-compose up

Then you will be provided with a port number. Eg 127.0.0.1:8000

Then you use the ip above and that port number.

See the other docker posts for solutions to some of the errors I ran into and fixed.

Setting up a new django project with Docker and getting gunicorn error “No module named…”

Just putting this here. I don’t understand docker fully yet. I have just managed to get it working for the first time. The solution I found for the “No module named…” error was to run the following command:

docker run -p 5000:5000 registry:latest